
Building a shooting space in your home can be difficult to say the least. For most photographers, a home studio is never large enough and every inch of space becomes a commodity. In this video we show you perhaps the easiest and cleanest way to hang seamless paper in your studio space.
There are dozens of ways to hang backgrounds and seamless paper in your studio space. If you own your own home, you can permanently install different backdrops from the ceiling or walls by mounting them with screws and lag bolts. A less intrusive method might be to use a few light stands with a horizontal background bar. Unfortunately these stands often take up valuable space in your studio and can also prevent you from keeping your rolls of paper as close to the back wall as possible. But what if you want the best of both worlds: something that wasn’t permanent but maximized your usable space without any clutter?
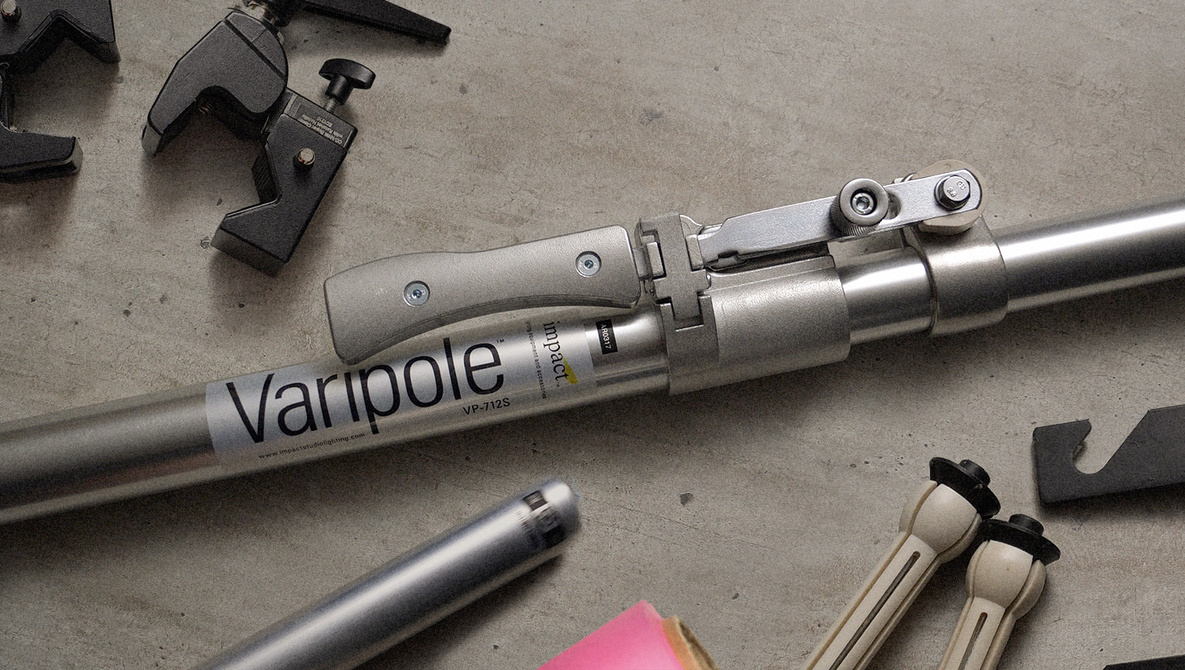
Meet the Varipole. Varipoles, sometimes called Autopoles, are basically poles that expand and lock into place using compression. You can mount these both vertically or horizontally, as long as you don’t overload them, and use them for a whole host of uses. The mostly widely used application of the Varipole is to mount backgrounds or lights permanently in your studio without having to drill or screw anything into your walls. They are also great for on location shooting when you need to setup a clean background indoors. For this build, we are going to use a set of Varipoles made by Impact but you can also use more poles to create square rooms if you need to shoot in a corner setup. In the video I used a simple bubble level to try to get my poles as straight as possible, but looking back, I probably should have just bought an Impact bubble level designed specifically for the Varipoles.
Now that we have the main support system set up, we need a system to easily mount our seamless paper so that we can quickly roll it up and down when needed. This is where the Impact Varidrives come into place. Varidrives are little inserts that you can place inside your rolls of seamless paper. As they expand, the Varidrives lock tightly into the center cardboard ream of your paper. One side of the drive has a gear which allows you to easily pull the paper out and then roll it back up. If you are feeling extra luxurious, you can also buy a set of motorized background rollers which let you lower and raise your paper with the push of a button. It’s also important to decide on the number of backgrounds you want in your studio because the Impact Wall Mounting Kits come in different sizes (we opted for the 3 roller version).
Once you have your Varidrives and your Wall Mounting Kit, you still need a way to attach everything to your Varipoles. The easiest method is to screw each side of your mounting kit into two super clamps. There are companies that sell mounting kits that come with super clamps but most of them only come with 1 super clamp per side which seems a little less secure for my taste. The last thing you want is for one side to become loose and have all your rolls of paper come crashing to the ground. For the particular super clams I bought, the screws needed to mount everything together are machine screws #10-32. It might be wise to use a few washers around the heads of the bolts as well.
Now that everything is built, let’s talk a little about paper. The paper I have always used is made by Savage which has become the industry standard for seamless paper backdrops. Little known fact, the background in every single Fstoppers video in our first garage studio was shot against a Savage Vinyl backdrop. The nice thing about Savage seamless paper is it comes in a variety of colors and sizes so you can find the exact perfect roll for your studio or on location shooting.
For the final tip, there is one thing you MUST do in order to keep your rolls of paper wrinkle free when mounting permanently. You really need to place an aluminum pole in the middle of your rolls of paper so that they have the proper support for long term horizontal storage. Even though each role of paper is mounted to a fairly robust cardboard core, this core will 100% start sagging if you do not properly support it. For this entire system to work flawlessly, you need an aluminum pole that not only fits inside the paper’s cardboard core, but the pipe also has to be wide enough to accommodate the Varidrives. If you never plan to roll your paper up and down, you can probably get away with just buying the Impact Support System but having owned these cross bars, I can tell you first hand that they do not work with the Varidrive system used in this build. The only aluminum pole I have found that works both in the ream of paper and with the Varidrive is this motorized aluminum pole made by Fotoconic. Unfortunately, after posting about these poles in the YouTube video, they completely sold out. The closest replacement for these poles I can find, but have not personally used, is the Manfrotto 047-3 Alu-Core bar. Based on the reviews, it seems like this works exactly like the Fotoconic version I bought off Amazon.
Once you have your aluminum bar inserted into your seamless paper core, simply attach your Varidrives to each side and raise the whole roll of paper onto your wall mounts. To prevent the paper from slipping on the aluminum bar, I added some Easy Liner Select Grip between the two cylindrical poles.